Overview
Tech design docs and workflows go here.
iContribute - We Rise by Lifting Others
A future where your ideal volunteer opportunity is a click away. iContribute is a not for profit that closes the gap betweeen students and local volunteer opportunities. Our mission is to foster community involvement amongst youth and show that with the right resources anyone can volunteer.
Table of Contents
- Tech Details
- Diagrams
- 4.1 Architecture Diagrams
- 4.2 Database ER Diagram
- 4.3 Mobile Frontend Component Diagram
- 4.4 User Flows
- 4.4.1 Onboarding
- 4.4.2 Apply to Opportunity
- 4.4.3 Create Opportunity
- 4.5 Sequence Diagrams
- 4.6 QA Workflow
3. Tech Details
3.1 Github Repositories#
These are all the current repositories we have that are constant.
Mobile (front-end) - iContribute-React-Native-Dev
Production mobile application of iContribute. Currently implemented with the firebase database.
Available: https://github.com/icontribute-founder/IContribute-React-Native-Dev
Web (front-end) - icontribute-webapp
Web version of iContribute, implemented to use the new server and database.
Available: https://github.com/icontribute-founder/icontribute-webapp
Main Server (back-end) - icontribute-server
Main server/API implemented with mongoDB. Defines routes to be used in the web application and mobile application.
Available: https://github.com/icontribute-founder/icontribute-server
Authentication Server (back-end) - icontribute-server-auth
Authentication server/API implemented with mongoDB. Defines all authentication routes to be used in the web application and mobile application.
Available: https://github.com/icontribute-founder/icontribute-server-auth
Landing Page (front-end) - icontribute-landingpage
Main iContribute landing page.
Available: https://github.com/icontribute-founder/icontribute-landingpage
Many of the other repositories we have are based on projects are currently in progress.
3.2 Tech Stack#
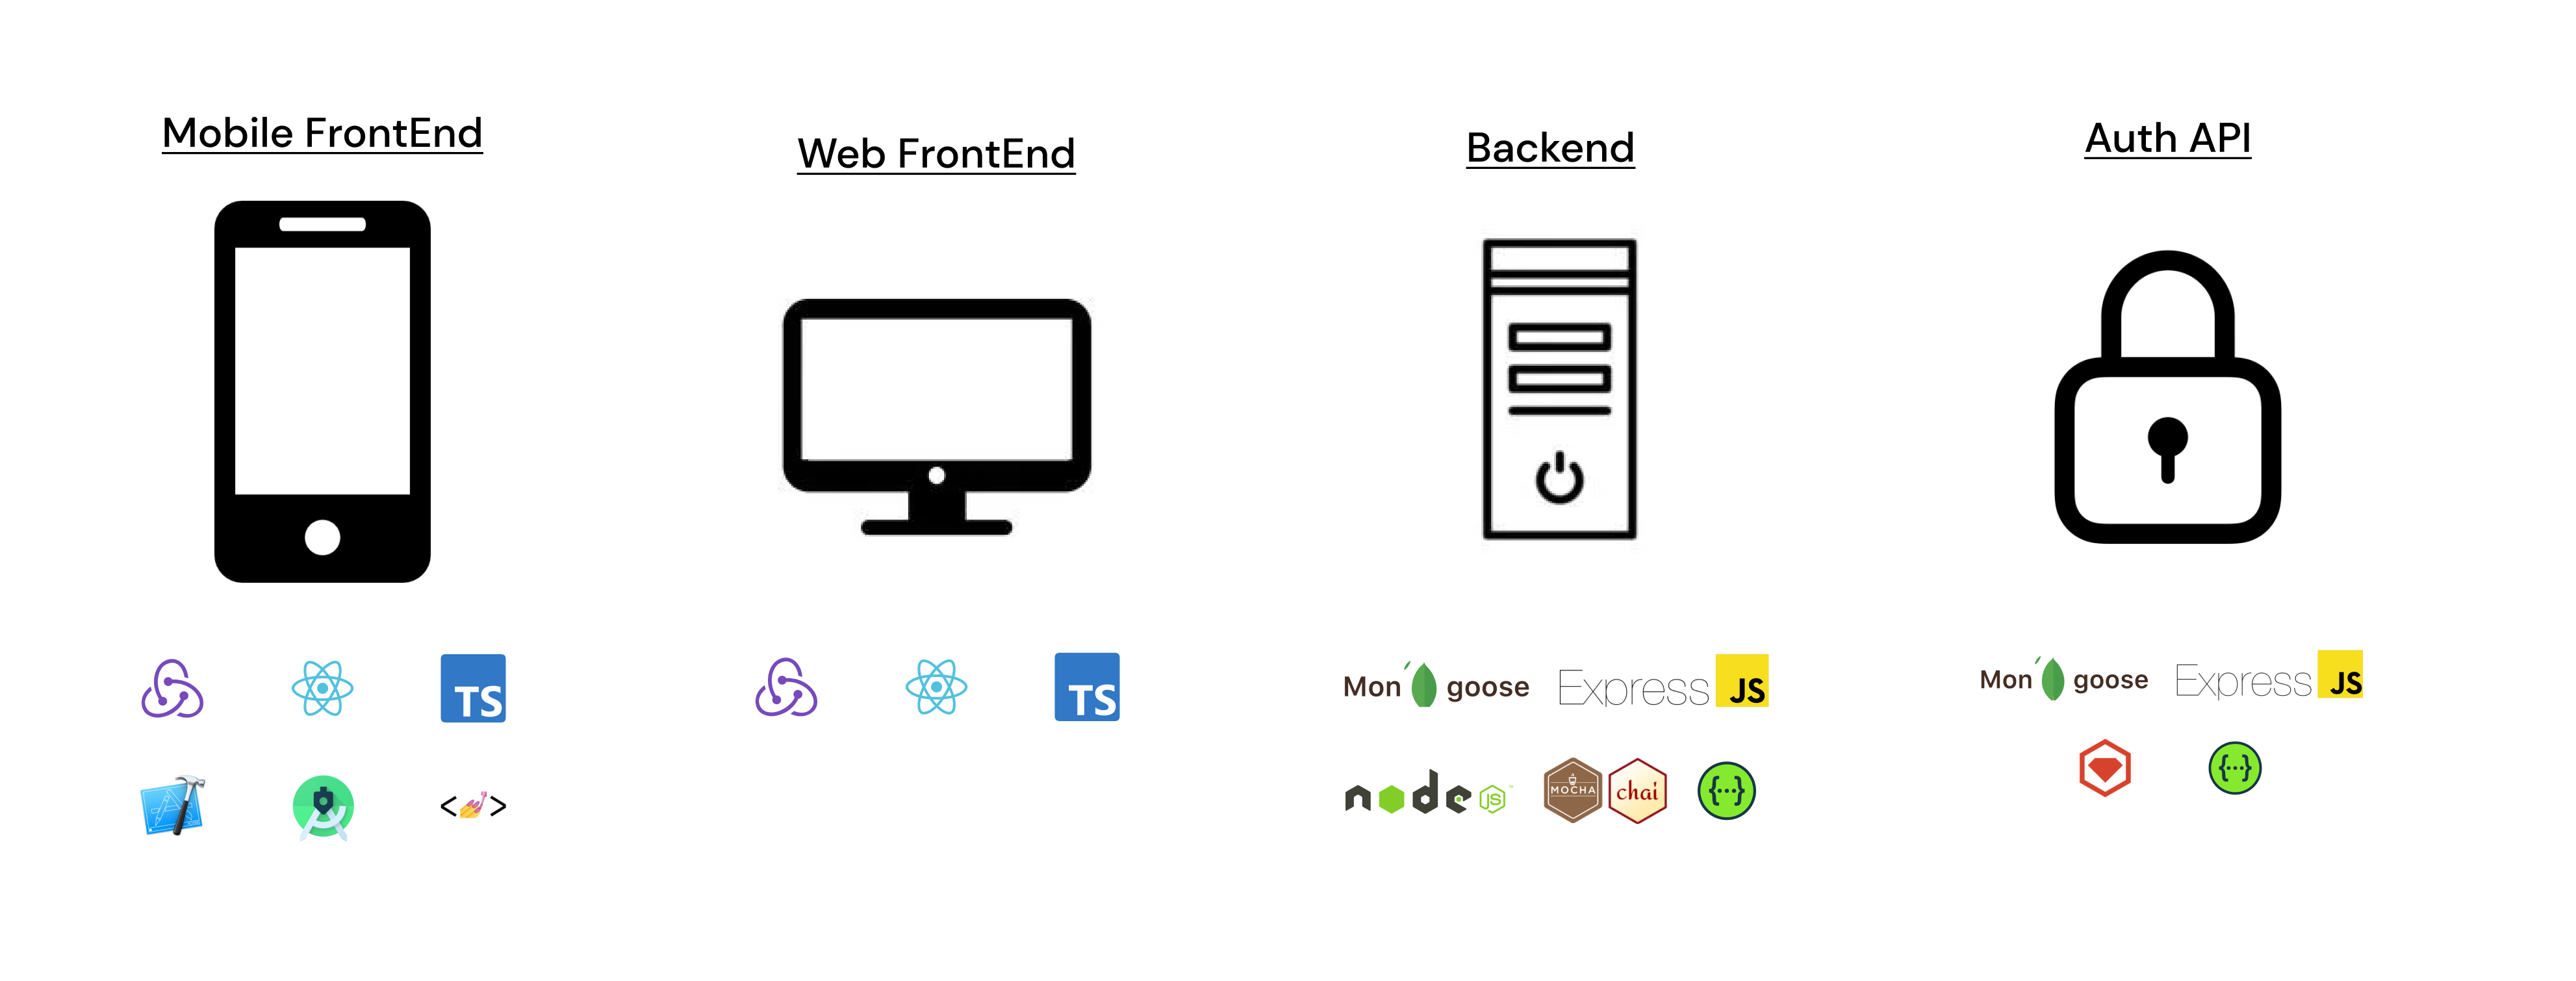
FrontEnd
React-Native and React:
- One of the primary versions we coupled React and React-Native because they are very similar development languages. Thus, if we ever need to transfer resources from web to mobile, it should be a more or less seamless development transition.
- React-Native allowed us to hit the ground running as we only had to build out 1 codebase, but could deploy to both the Android and Apple store without having to learn two separate languages
- Additionally, compared to other frameworks that support cross-platform mobile app development such as Flutter and Xamarin, React-Native was one of the stronger and more established open-source communities. This meant that we could rely on other developers across the globe in case we got stuck in a pinch.
Other FrontEnd Technologies used:
- Redux - Global state management library
- StyledComponents - CSS-in-JS library
- Typescript - JS superset
- Jest - Testing library (future)
- Android Studio & Xcode - mobile development
Backend
NodeJS and ExpressJS:
- Since our frontend codebase is primarily Javascript-based, we wanted to leverage NodeJS as our backend framework so that the development team wouldn't have to change languages if they wanted to work full-stack.
MongoDB:
- Our team actually originally used Firebase to set up our Mobile app as fast as possible and get it kickstarted. That being said, MongoDB provides a higher performant database once we need to scale and for that reason we decided to port over earlier on to avoid later costs down the line.
- Our team actually originally used Firebase to set up our Mobile app as fast as possible and get it kickstarted. That being said, MongoDB provides a higher performant database once we need to scale and for that reason we decided to port over earlier on to avoid later costs down the line.
Other BackEnd Technologies used:
- Mocha and Chai: Test Framework and Assertion Library
- SwaggerUI - Documentation platform
3.3 Backend Folder Structure and API Functionality#
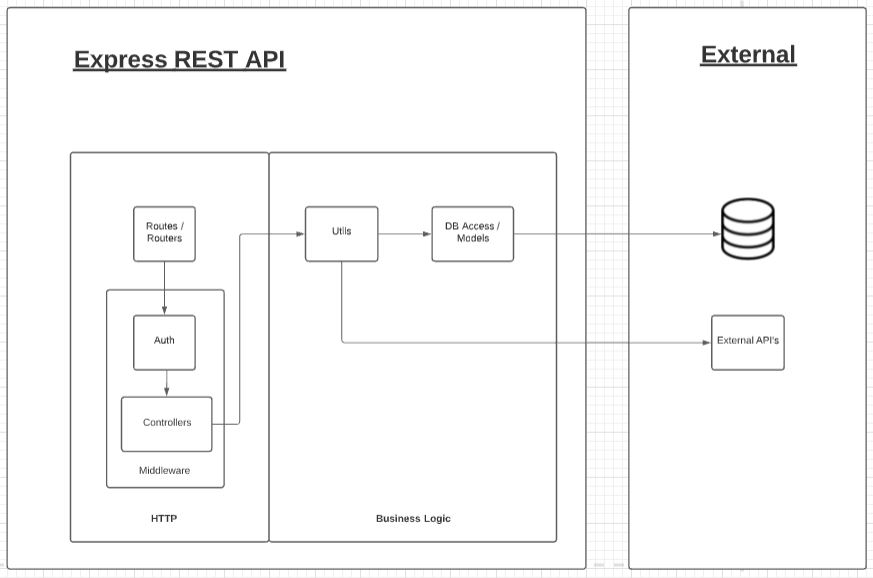
Router: ./src/routes#
app.ts is the entrypoint to the API and would call different routers for different functionalities. The router defines which routes would use which controllers. This allows for abstraction between the routes and the controllers.
Authentication: ./src/middlewares/auth#
The authentication folder ensures that any of the HTTP requests are coming from users and resources with the right authentication.
Controller: ./src/middlewares/controllers#
Each controller is in charge of a different base route and group of requests. Each route consists of either a GET, POST, PUT, and DELETE request. We make sure that there is no business logic in these files and call on services inside each route. This allows for scalability in the future when there are many more services and routes.
Utilities: ./src/utils#
The utilities folder contains files that harbour the business logic in our routes.
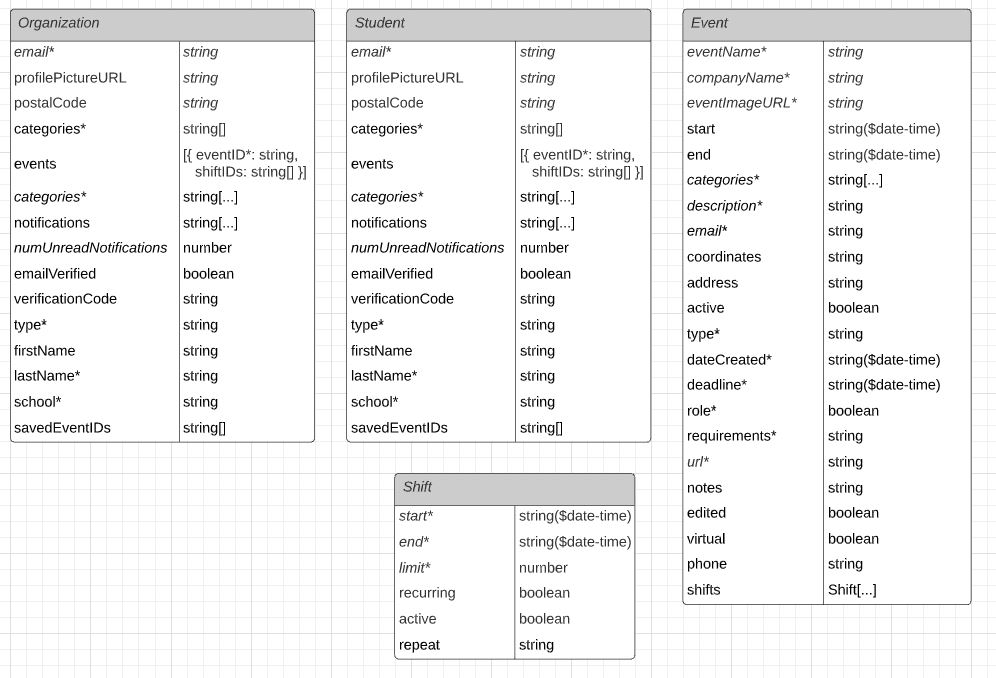
Models: .src/models#
The models folder contain all the information concerning schemas and their properties. The models defined are the following:
- User
- Student
- Organization
- Event
- Shift
- Notification
- Review
Swagger Documentation#
For our main and authentication API, we used Swagger to document the routes. All route documentation can be accessed through the following links:
- Main API documentation (icontribute-server)
- Authentication API documentation (icontribute-server-auth)
3.4 Security#
3.5 Best Practices#
3.5.1 Pull Requests#
In the past, our Pull Request standards have not fully been set in stone, so their level of context and description for a PR reviewer greatly varied. We are introducting a standardized PR template in our GitHub repositories, so that the most important points of a PR are highlighted for a reviewer who is about to read your code. It follows the following format:
## Why ##[ A short description of why this change is required ]
## What Changed ##[ A description of what changed to address your reasoning above ][ If applicable, did you consider adding translations? ]
## How I Tested ##[ Bullets on the test cases that I covered ]
## What’s Next ##[ If your PR has a second part coming, or is a work in progress (WIP), give some context for your PR reviewers ]
## Link to Ticket/ Bug ##[ Link to your Notion ticket ]
## Screenshot ##[ Android and iOS if applicable. Before and After images to demonstrate visual differences ]This PR template has so far been implemented in the following repositories:
- icontribute-server
- icontribute-webapp
- icontribute-React-Native-dev
- icontribute-web-integration
3.5.2 Designer x Developer QA Workflow#
To ensure that our developers are implementating our designs on a 1:1 ratio (as accurately as possible), in past terms we have held design handoff meetings where the designers would present their Figma mockups to the developers and answer any questions that may arise before implementation begins.
That being said, to ensure that implementations are true to designs even after that initial design handoff, we'd like to include a step in the developers workflow, so that designers can review and QA UI components/ screens before they are pushed to production depending on the product/ the feature's scope.
This will be done through our new Slack channel #design-dev-pr-reviews. As usual, once a developer publishes their front-end (or design-related) PR, they must request a PR review from a fellow developer. In addition to this, they must post a link to their PR in the #design-dev-pr-reviews Slack channel and ask for a designer to take a look at the before/after screenshots and provide any feedback/ suggestions that they may have. In the case that the designer has difficulties accessing the PR through the provided GitHub PR URL, the developer can instead send a message in the channel that describes:
- what the PR accomplishes
- what changed
- before/ after screenshots of the UI
After the designer's feedback/ comments are addressed, as well as a developer peer review is complete + merge conflicts/ Github actions are resolved, the PR can then be merged as usual since it has been QA'd successfully!
4. Diagrams
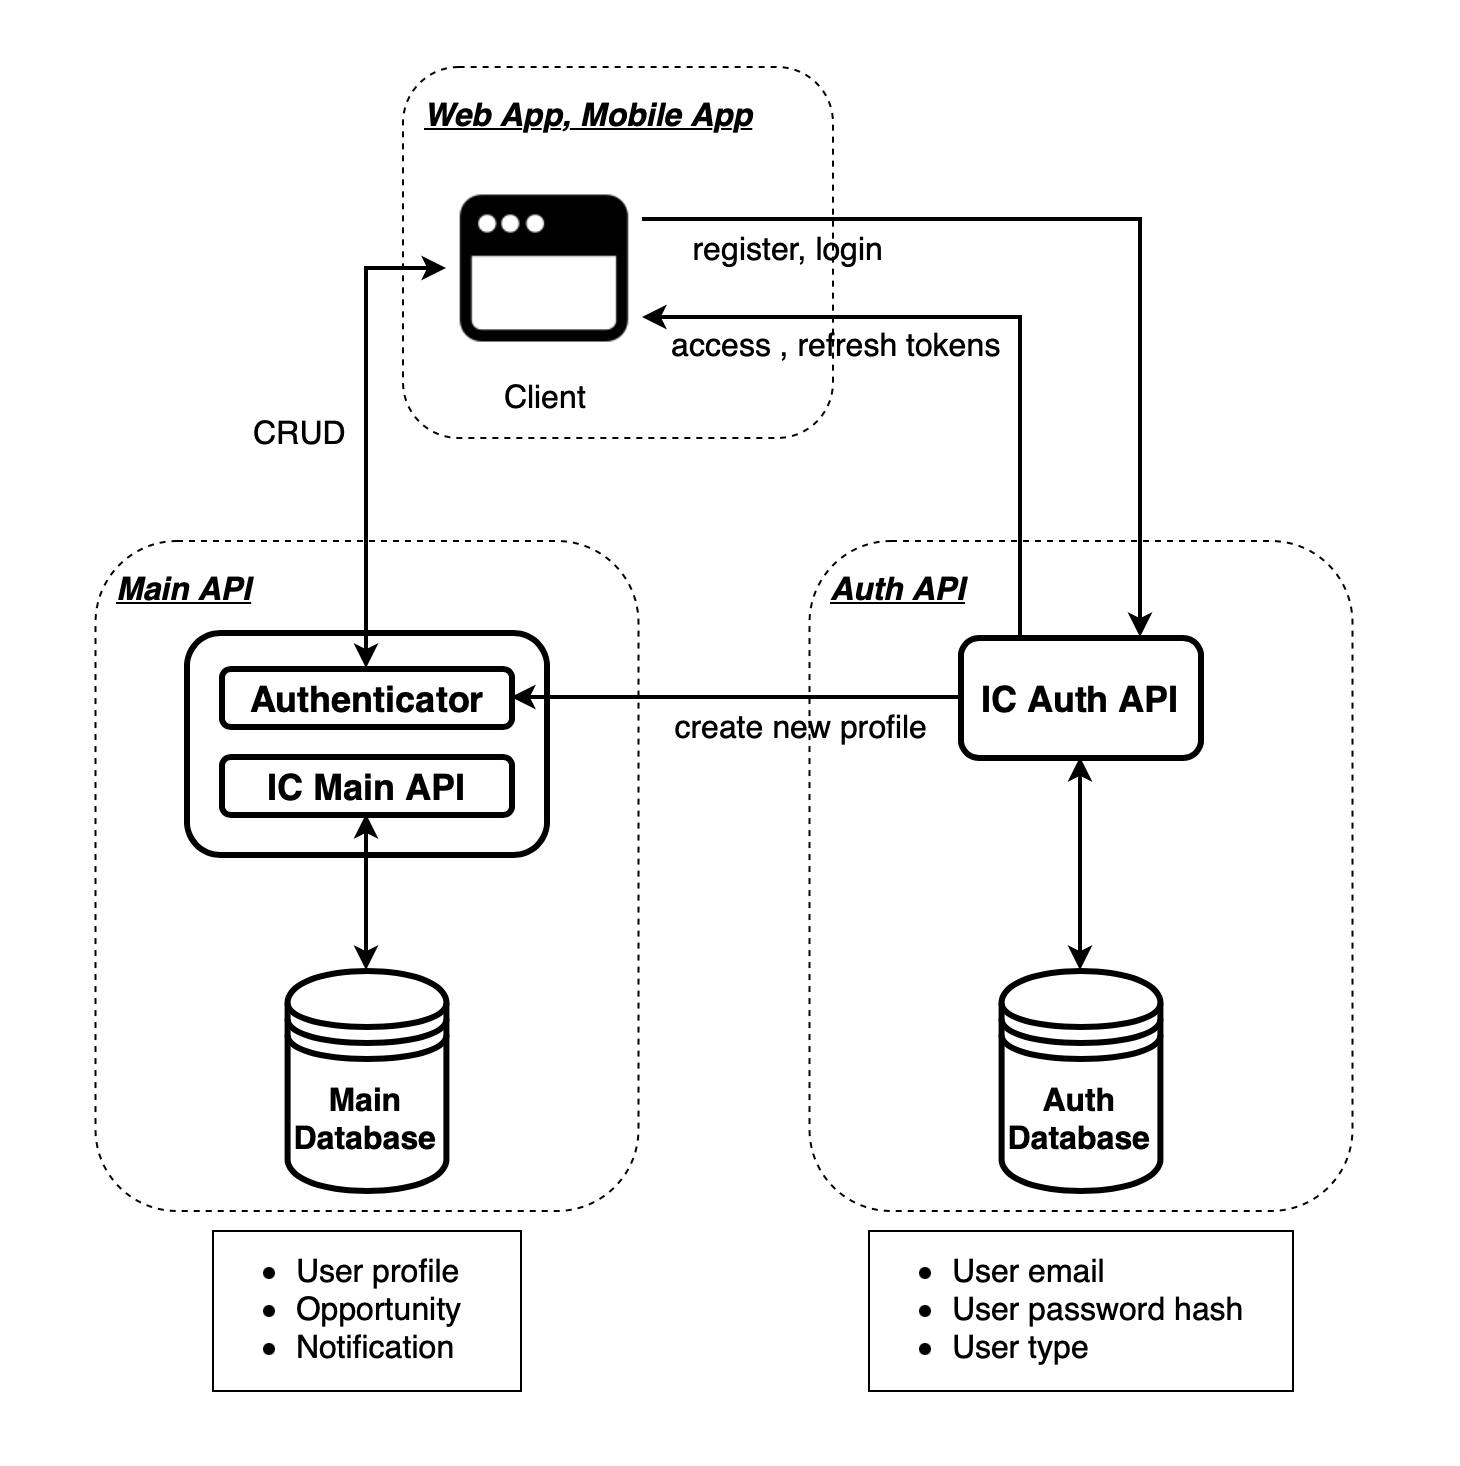
4.1 Architecture Diagram#
4.2 Database ER Diagram#
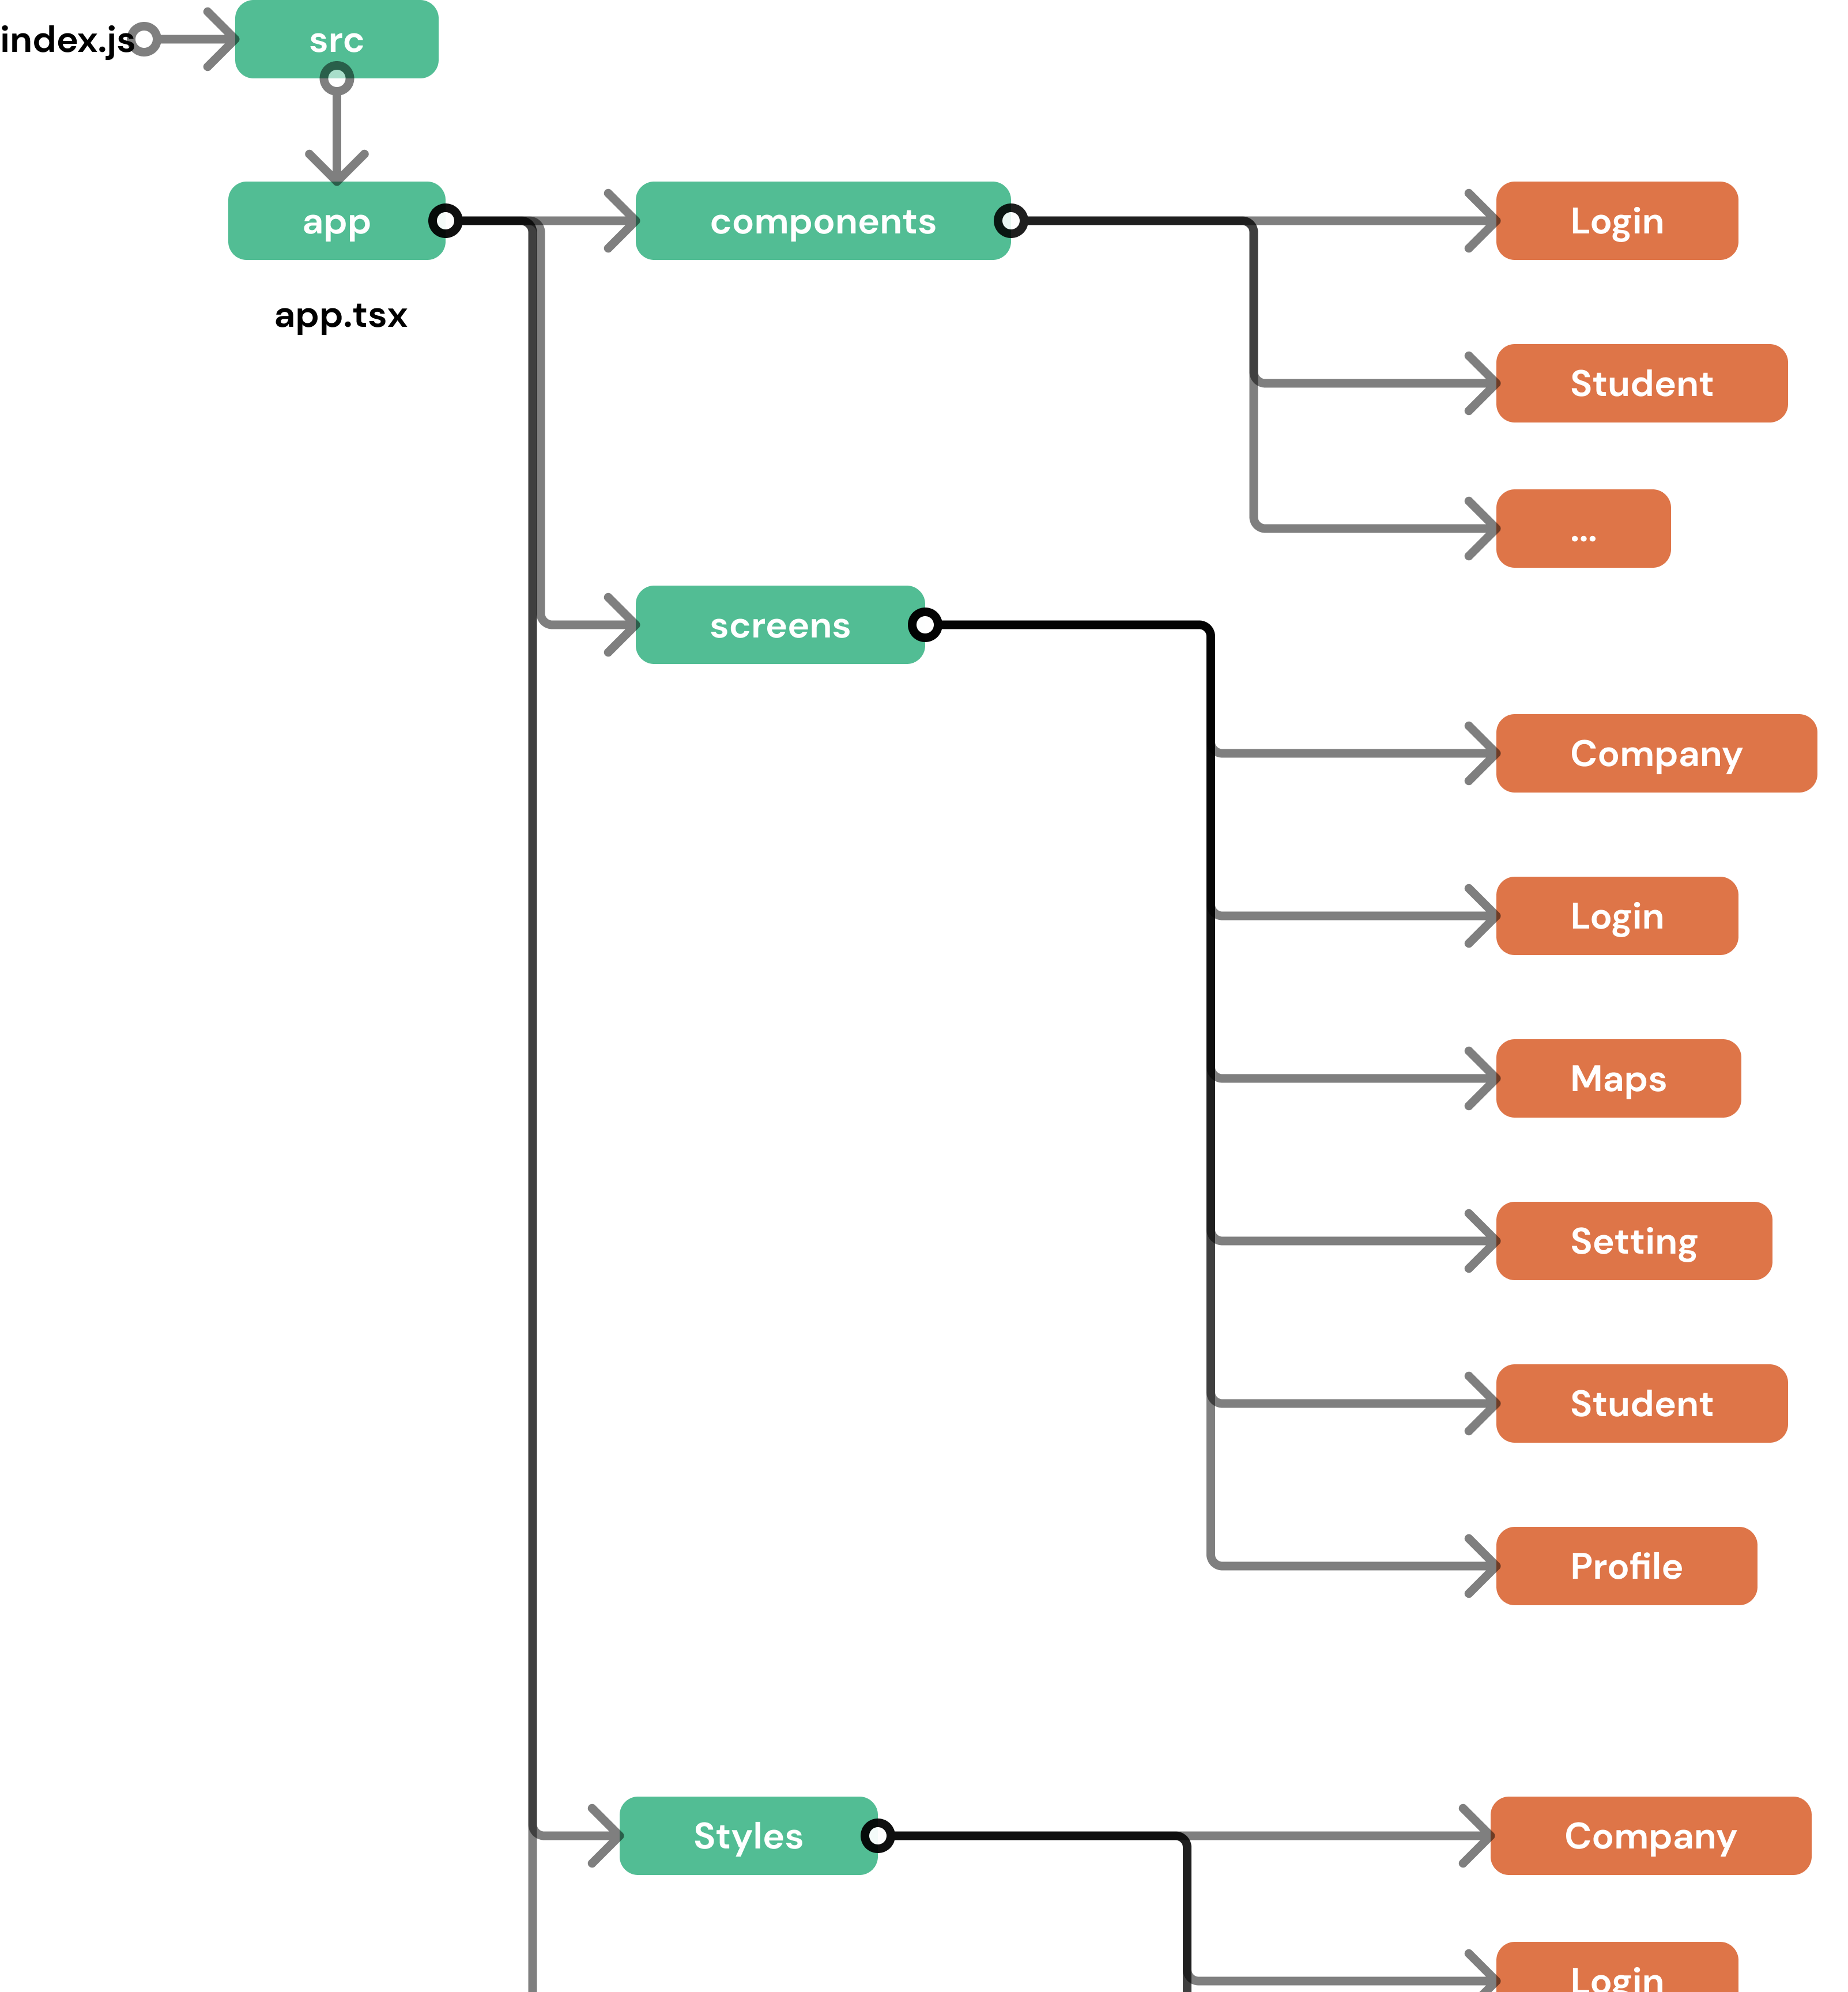
4.3 Mobile FrontEnd Component Diagram#
4.4 User Flows#
4.4.1 Onboarding#

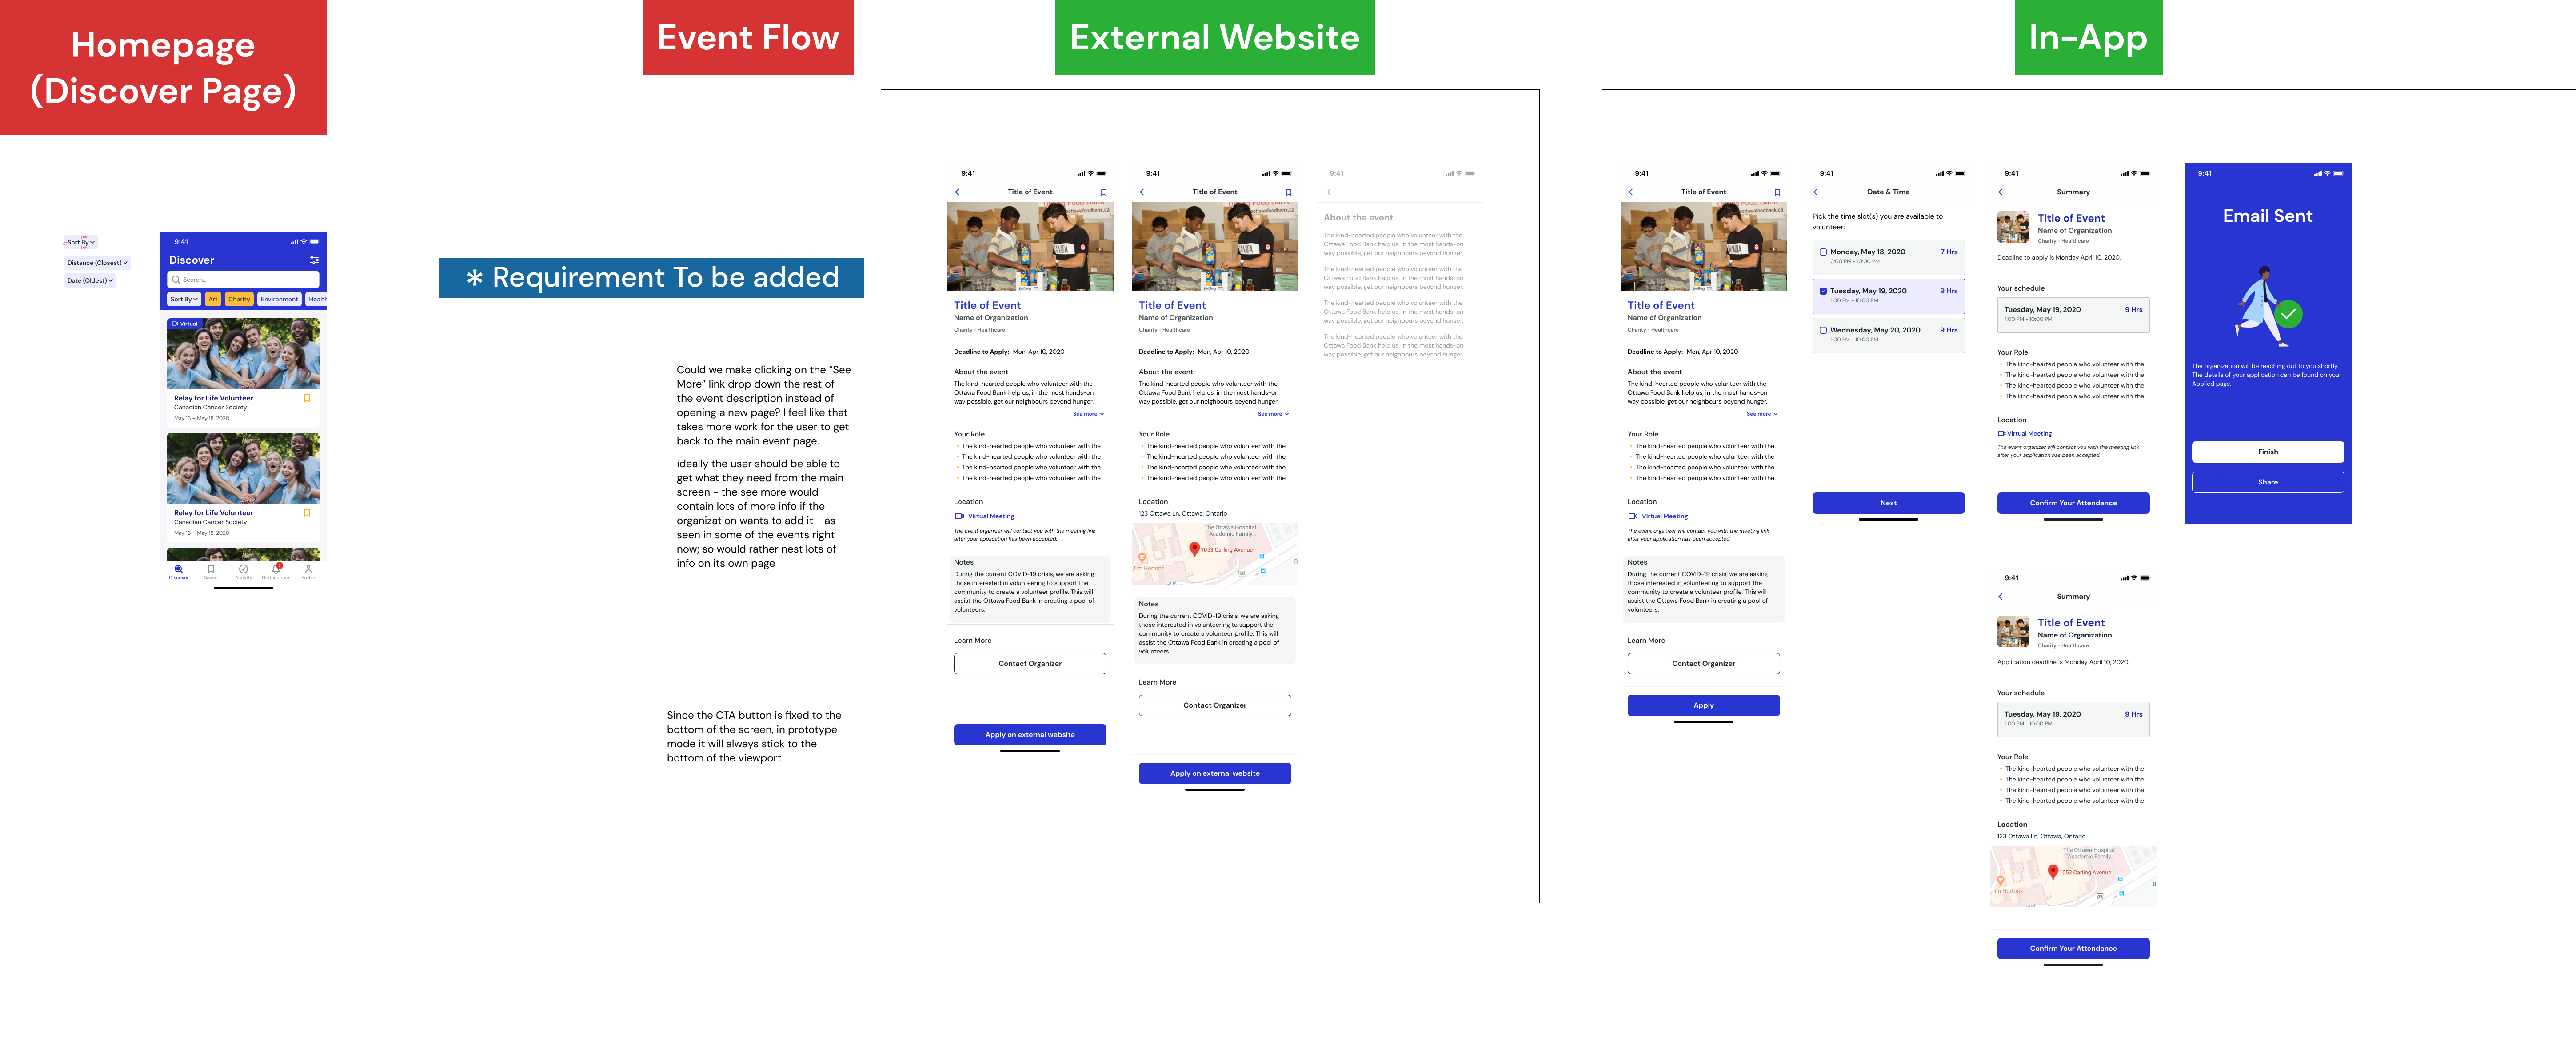
4.4.2 Apply to Opportunity#
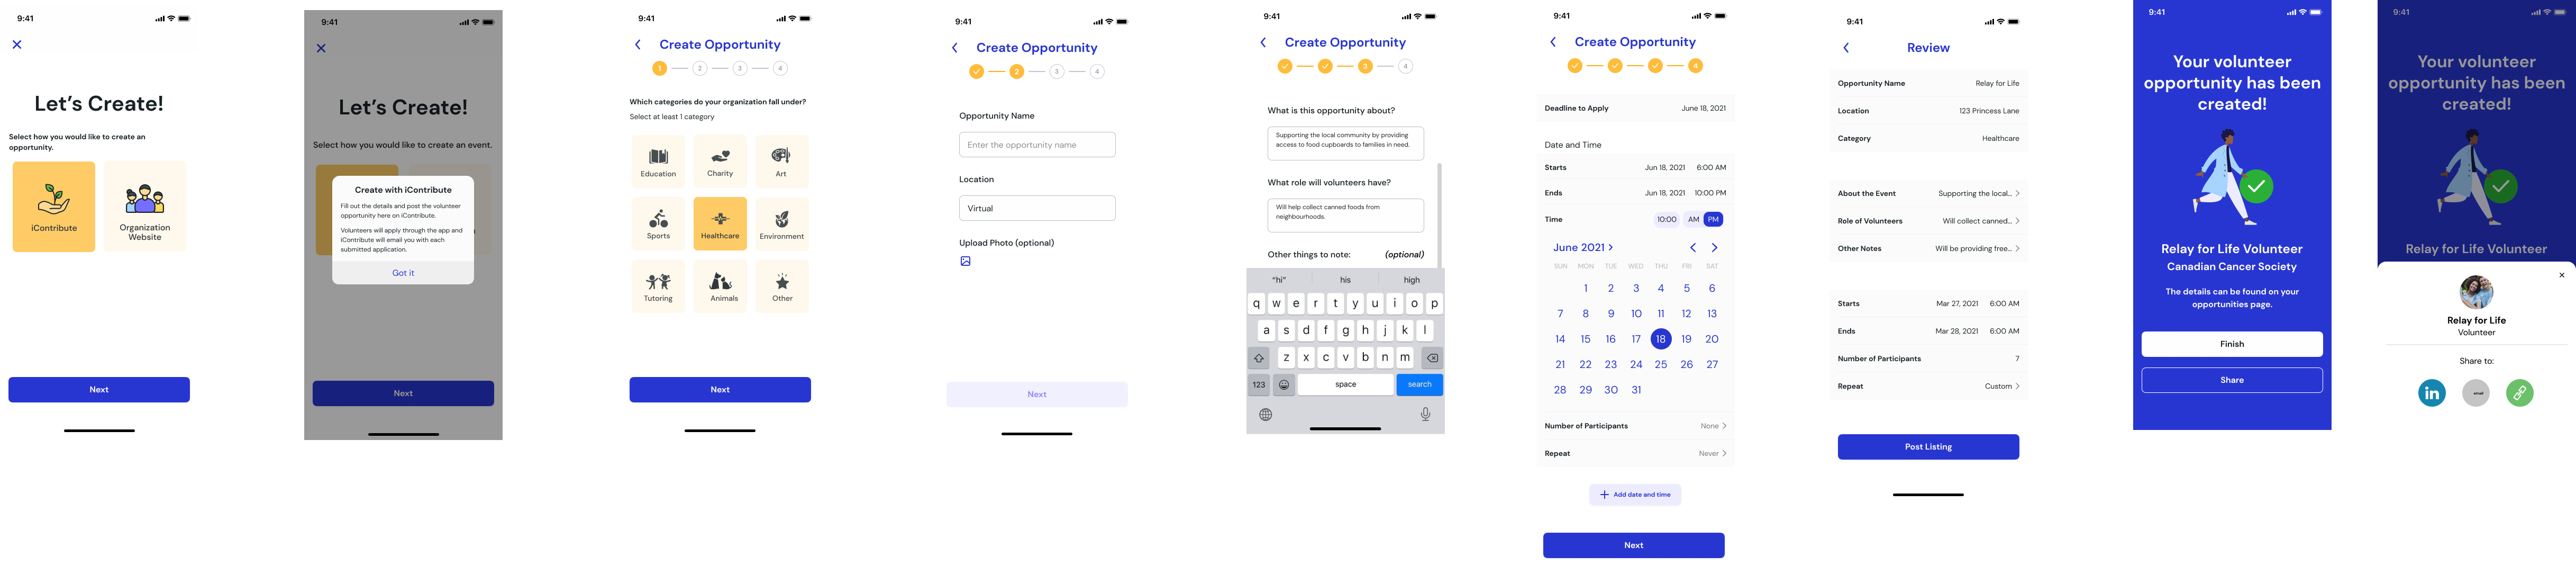
4.4.3 Create Opportunity#
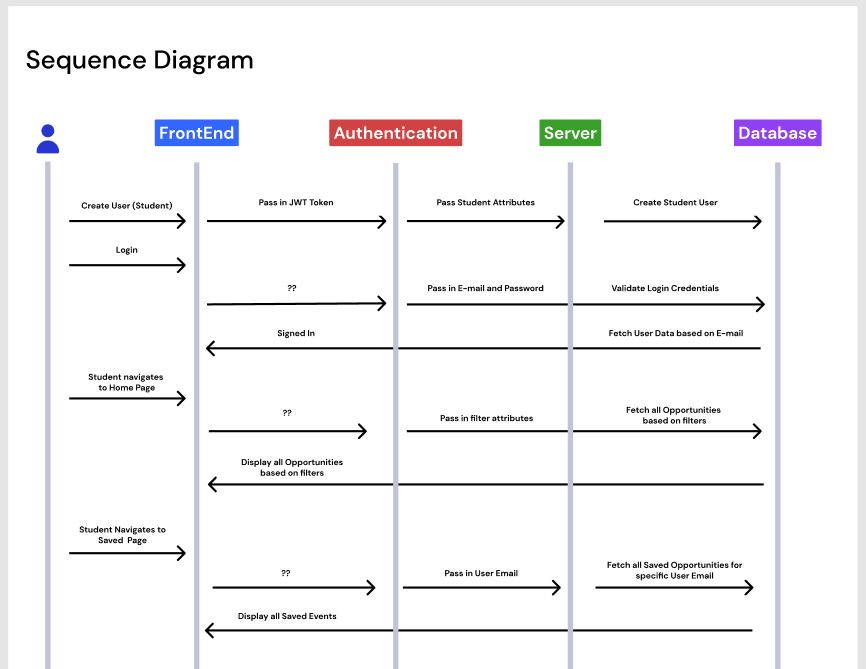
4.5 Sequence Diagrams#